Plataforma de Educação Humanizada

Torne-se Membro

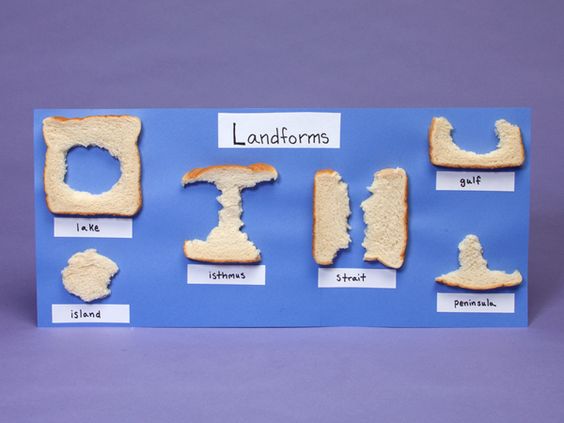
Landform Bread Art

Disciplina: Art | Geography
Ano escolar: 1st | K level
Tipo de Recurso:
Tags:

Blue construction paper (one sheet per student)
Bread slices (stale or toasted for easier handling)
Scissors
Glue or glue sticks
White paper (for labels)
Markers or pens (for writing labels)
Preparation:

Prepare bread slices by cutting them into various shapes to represent different landforms. Allow them to dry out or toast them slightly to make them easier to handle.
Creating Landforms:

Lake: Use a slice of bread with a small hole in the middle. Paste it on the blue paper to represent a lake.
Island: Use a small piece of bread with just the middle portion intact to represent an island.
Isthmus: Cut a slice of bread so that it is wide at the ends and narrow in the center. Paste it on the blue paper to represent an isthmus.
Strait: Take two roughly halved pieces of bread and place them closely together to represent a strait.
Peninsula: Cut a slice of bread to create a shape with land extending into the sea on three sides. Paste it on the blue paper to represent a peninsula.
Gulf: Cut a slice of bread to create a shape with land that curves inward, representing a gulf.
Labeling Landforms:

Cut small pieces of white paper to create labels for each landform.
Write the names of each landform on the white paper labels (e.g., Lake, Island, Isthmus, Strait, Peninsula, Gulf).
Paste the labels next to the corresponding bread landforms on the blue paper.
Presentation and Discussion:

Have students present their landform creations to the class, explaining each landform and how they represented it with bread.
Discuss the characteristics of each landform and how they are formed.